DIY Project- MTB Orienteering Map Board
Editor's note: This article was originally published in July 2011 and has been updated in July 2023 for accuracy and comprehensiveness.
The local orienteering club scheduled a mountain bike orienteering event that they will be hosting at the local state park. I am very interested in this event, so I started my research to find out more about the sport. Like any sport, there is always some type of gear that is unique to the sport. Mountain bike orienteering is no different.
In the case of mountain bike orienteering, it happens to be a piece of gear called a map board. The map board is attached to your handlebars and holds your orienteering map so you can ride and read your map at the same time. Online you can find these boards for anywhere from $60-$90. Mountain bike orienteering is a niche sport where I live and I might see one event a year. So, the online price for a map board is more than I would like to pay.
With that, I figured that I could make my own. The hardest part was to figure out what supplies I would need for this DIY project.
Supplies:
- Clipboard
- NiteRider light mount
- Tire patches
- Rear Derailleur washer
- 1-gallon zip-lock bag
- Binder clips
 |
| Supplies needed for this DIY project. |
The Process:
Once I had all the supplies that I needed for this project. The first place I started was to remove a hanging tap on the chipboard. This item was just an annoyance because it rattled and didn't provide a function.
 |
| Remove this tab. |
Step #2:
Remove the light mounting shoe from the NiteRider mount. Now, we see that we have a recessed circle.
.


Step #3:
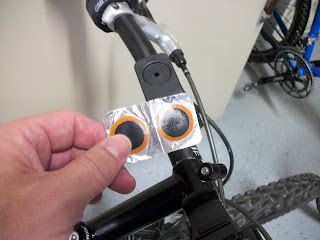
A spacer will needed to fill the recessed circle. I figured that a tire patch would work. While it almost fits the circle I still need another spacer for height.
 A vulcanized tube patch will be used as a spacer.
I used a washer from a rear derailleur pulley. Always keep those small parts. You will never know when they can be used.
 |
| The tire patch is used as a spacer. |
I used a washer from a rear derailleur pulley. Always keep those small parts. You will never know when they can be used.
 |
| Derailleur is used as a spacer. |
Step #4:
Drill a small in the clipboard. For my handlebar set-up, I drilled the hold in the clipboard, so the bottom edge of the clipboard doesn't protrude past the steer tube.
 |
| The finished product. |
This project ended up being more proof of concept than a functional map board. Regarding the NitRider mount, it didn't provide the height that I needed. The map board needs to sit up higher off of the handlebar. In mountain bike orienteering you need to be able to access a cycle computer. This configuration didn't provide the space that was needed to run a computer. Aside from those issues, The concept of the map board works.
Now It's Your Turn-
I would like to hear if you have tried to make a map board. Did you find a solution to raise the map board tighter?


Comments